

How To Get Rid Of Sun Flare In Camera Raw
How to Remove Flash Glare in Photoshop
past Benjamin Martorell on November xix, 2021
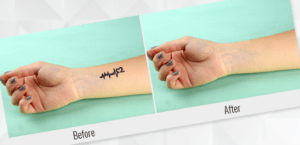
Are you lot looking to remove wink glare from a flick you took? We have all been there. Y'all take a nice pic of your friends or family but to realize later that there is flash glare in the photo. Luckily, you can remove flash glare in Photoshop!
Wink glare can be incredibly frustrating. There aren't many things more annoying than, for example, having to remove a big bright spot over an eye, even if it doesn't fully cover the eye.
What is wink glare?
Glare is ordinarily visible as either vivid spots in people'due south glasses, streaks of low-cal, or as circles or polygonal shapes in an image. They aren't always very brilliant and tin be unlike colors. Glare is likewise sometimes not a shape or spot but a hazy glow.
Unfortunately, glare is often unavoidable and difficult to forestall when taking pictures. This is why getting rid of glare is i of the nigh common tasks in photo editing and probably one of the showtime Photoshop skills you will learn.

Luckily, you're in the right place. This tutorial will explain:
- What is wink glare?
- What causes information technology?
- How to remove flash glare in Photoshop
Causes of Flash Glare in a Photo
Wink glare, also known as lens flare, is scattered light that bounces around in the camera before reaching the photographic camera sensor. In other words, this "non-image forming light" does not follow the intended path of the camera lens (nor is information technology typically what the photographer wants).
Lens flare is more of a problem in broad-bending and zoom lenses, which take more lens components than prime camera lenses (i.e. lenses with 1 focal length). In short, there is simply more opportunity for calorie-free to scatter in a wide or zoom lens than in a prime lens.
Unsurprisingly, sunlight is a common source of lens flare. Apparently, glare tin occur when the camera is facing the sun directly. Simply even when the camera is not pointing toward the dominicus, some sunlight may even so enter the camera lens at a precipitous angle.
To foreclose this, all lenses come with lens hoods, which aid block the main light source (using your hand, without getting it into the epitome, tin can besides work).
Light sources — ceiling lights, lamps, on-camera flash, strobes, etc. — likewise cause flash glare. This is oftentimes how glare appears in spectacles. Reflection from windows, mirrors, and even water can also cause glare.
Fortunately, at that place are lighting techniques and lens filters that minimize glare and reflection.
Steps to Removing Flash Glare in Photoshop
Photoshop offers many tools and techniques to remove lens flare. Although using them may seem a little confusing at kickoff, they are actually fairly straightforward.
Once you get the hang of them, you will have no trouble removing flash glare from your images.
Before we get started, brand sure you have Photoshop downloaded on your estimator. You can get it for $9.99/month with Adobe's Creative Cloud Plan.
Here are some of the easiest ways to remove flashglare in photoshop:
i. Employ the Lasso Tool
Using the lasso tool is perhaps the easiest mode to get rid of glare. With the lasso, you can simply draw around a spot you want to remove.
- Click the Lasso Tool from the left side of the window (or press "L" on the keyboard).
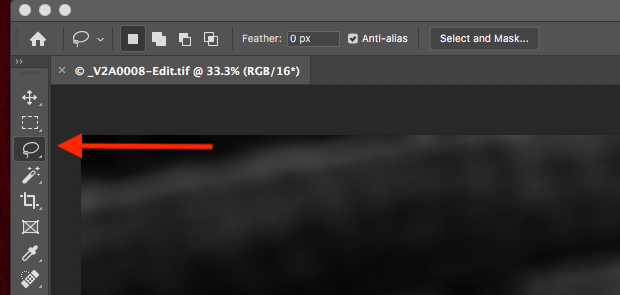
- Make a circle around the spot.
- Correct-click and select Fill.
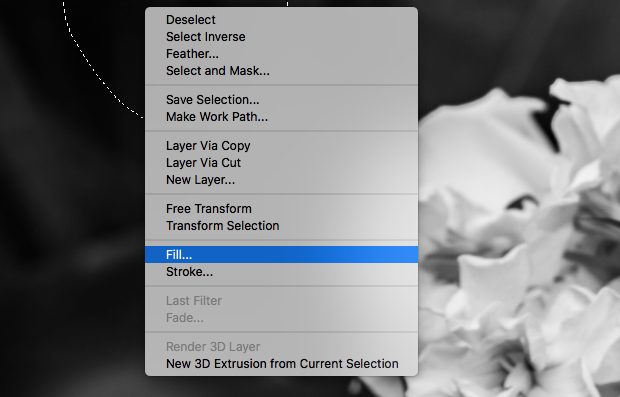
- In the window that appears, next to "Contents:" select Content-Aware.
- Echo these steps for the residuum of the spots.
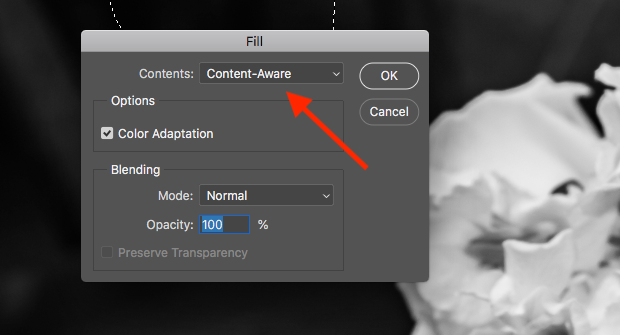
Note: This method is generally suitable for photos with solid colors or repeating patterns. Past choosing content aware, you are allowing Photoshop to make the edits automatically.
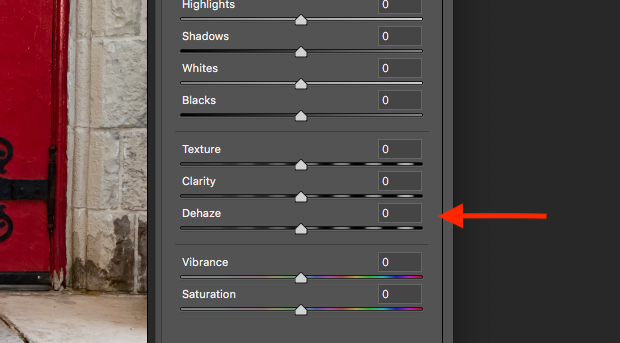
2. Dehaze Epitome in Camera Raw
If your photograph has areas that wait hazy, the dehaze option in Photographic camera Raw will reduce this effect.
- Click Filter at the top menu and select Camera Raw Filter.
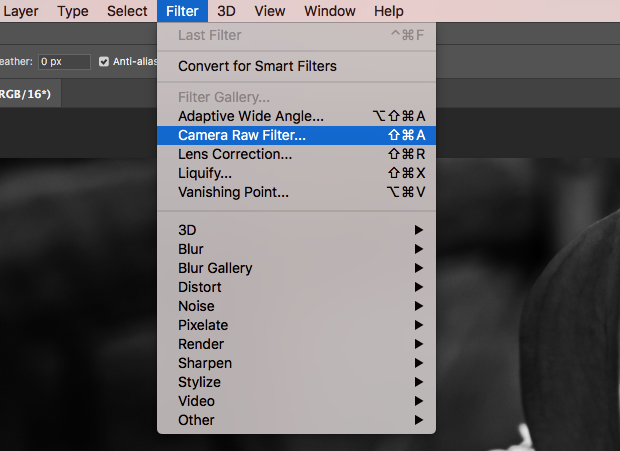
- In the window that appears, adjust the Dehaze slider to reduce the glare. If it helps, adjust the other sliders every bit well.
This may not get rid of all of the brume. In that case, follow these steps:
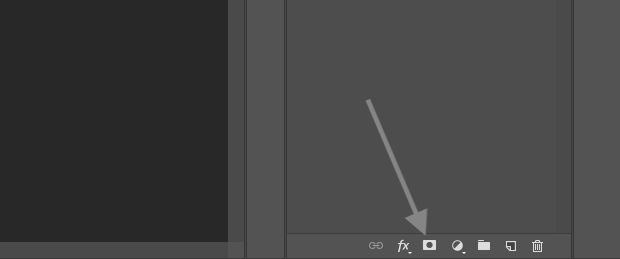
- In the layers panel on the right, right-click the Background layer and select Duplicate Layer. A copy of the background layer now appears above it.
- At the lesser of the layers panel, click the Mask icon to create a mask. Make sure the copy layer is still selected.
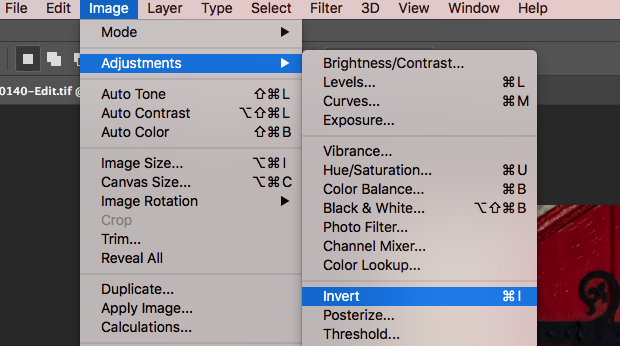
- Click Image at the meridian card, then select Adjustments, then cull Invert (or Cmd/Ctrl + I).
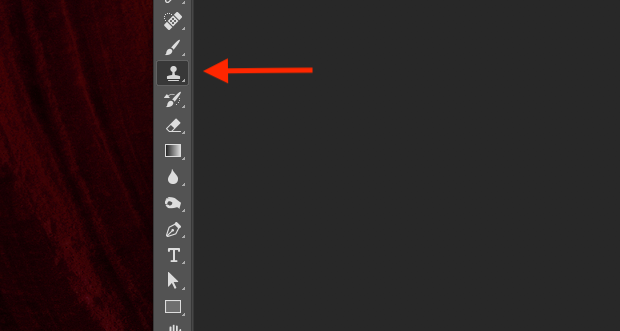
- Select the Castor tool and brush the hazy areas.
Notation: With a mask, yous can remove parts of a layer to show the layer beneath it. And so, in effect, you are looking through the layer that is on top.
three. Paint Glare Away with the Clone Stamp Tool
The clone stamp tool is your all-time friend when information technology comes to removing lens flare because you can "paint" over the glare using source points. Source points are other spots in the paradigm; in this case, those without glare) This is why the clone stamp tool is really effective at riding your paradigm of unwanted brilliant spots or areas.
- Select the Zoom Tool (printing "Z" on the keyboard) and press Alt/Choice on the keyboard to zoom in shut to a bright spot or area. Zooming makes it information technology easier to run across what you are doing.
- Select the Clone Stamp tool (or press the "S" key).
- Printing and concord the Alt/Choice on your keyboard. This changes the cursor icon indicating that yous tin choose a spot abroad from the glare.
- Click on a spot and let get of the Alt/Pick fundamental.
- The spot y'all chose is now visible in the Clone Stamp cursor circumvolve, which makes it like shooting fish in a barrel to see what you are going paint.
- If not, click Window from the top carte du jour and select Clone Source.
- In the window that appears, cheque Show Overlay.
- Paint over the glare and readjust where you lot choose to paint from.
Using the Clone Stamp tool does take some exercise. Also, don't be afraid to zoom in more when you lot need to. The more than you zoom in, the more authentic you can be.
Also, it'southward skillful practice to zoom in and out as yous work. Areas you edited might look good up close merely not from a regular distance.
Annotation: Please exist aware that the background layer is the original prototype. If you don't want to edit it directly, simply add a new or duplicate layer and make the edits on that. The groundwork layer will remain untouched as you work.
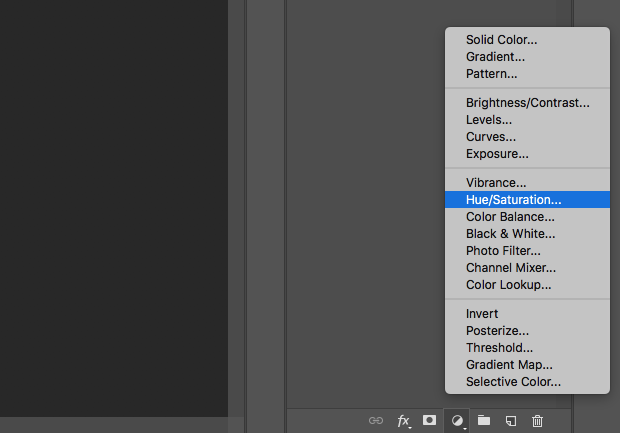
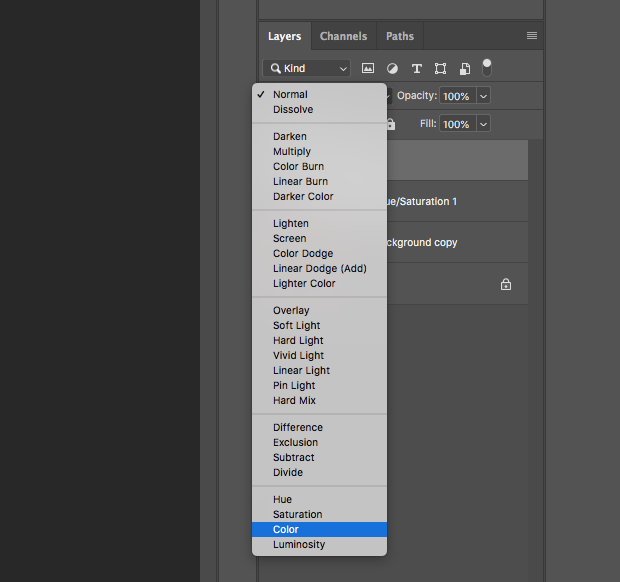
4. Add an Aligning Layer
This technique is effective at reducing lens flare with color, which is ofttimes green.
- Click the Adjustment Layer push at the lesser of the layers panel.
- Select Hue and Saturation from the carte.
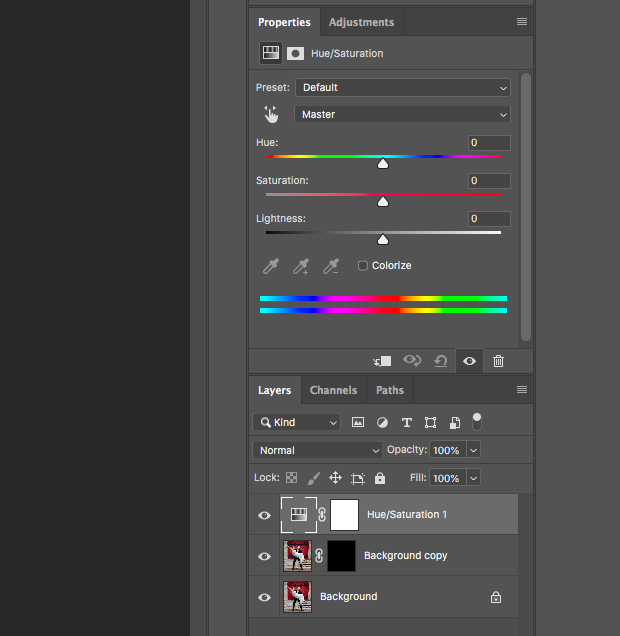
- Click the hand symbol adjacent to Master. The cursor becomes the dropper tool.
- Click the flare spot to select the colour.
- Motility the Lightness slider to the left until the color of glare matches the background.
- Arrange the other sliders to get rid of more colour if needed.
- Because the adjustments changed the whole image, select the Mask in the Hue and Saturation layer. Masks show what role of the consequence you want to either bear witness or hide; the white brush volition show the upshot, and the black brush will hibernate it.
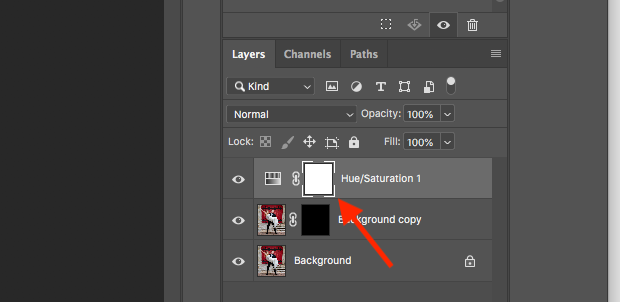
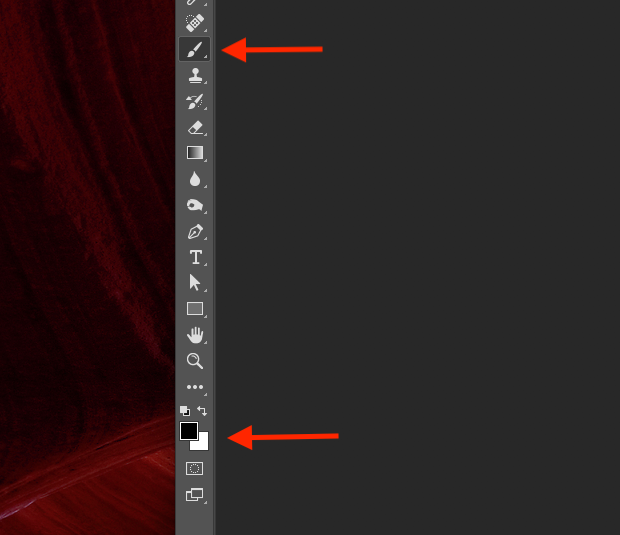
- Select the Blackness Mask and the Brush Tool.
- Brush over the glare spots. Y'all can see the changes you lot brand in the layer mask.
5. Add together a Color Layer
- Create a New Layer.
- Gear up the layer mode to Color.
- Click the Brush Tool (or press "B" on the keyboard).
- Printing Alt/Option to clone a nearby spot then brush over the glare.
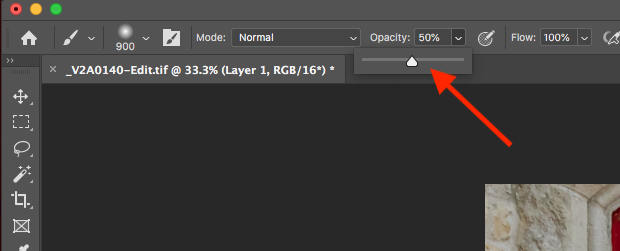
6. Use the Brush Tool
- Create a New Layer and set the layer blending style to Color.
- Select the Brush Tool (or press "B" on the keyboard) and set it to "normal".
- Reduce the Opacity to 50%.
- Printing and hold the Alt/Option key to modify the cursor icon to a dropper.
- With the dropper, click a spot next to the glare and stop pressing the Alt/Option key.
- Brush over the glare.
Advantages of Flash Glare
While glare has obvious downsides and is usually non what people desire, information technology does have its advantages. For those who want a more than artistic or edgier look, lens flare can be that actress chemical element that elevates the picture from a regular one to a more memorable photo.
So in this sense, wink glare has a lot of potential and a bang-up style to concenter attending if that is what yous are looking for. It can likewise help yous develop a photography manner that is unique to yous.
For case, if you are out shooting in the woods early in the morning or belatedly in the evening—when the sun is shining depression—the light coming through the trees creates a starburst issue. This can add a nice chemical element to the image.
Similarly, capturing rays from the sun as it only starts to rise above the horizon is some other great way to make a picture more bonny.
Another example is wink glare in a portrait. Pictures of a couple getting married often have glare (only in a way that doesn't detract from the overall prototype).
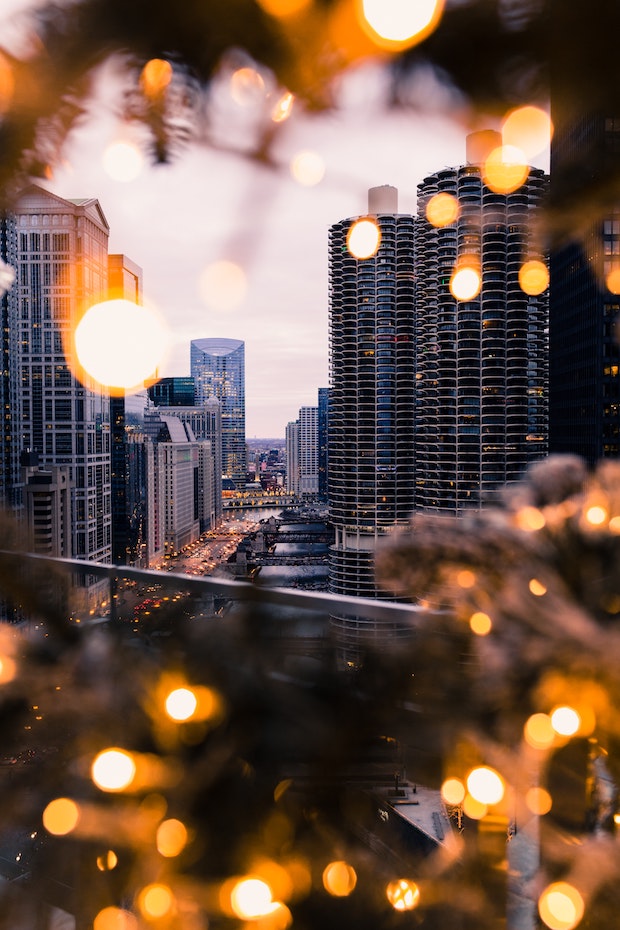
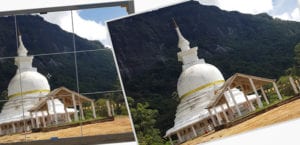
Equally the images below demonstrate, glare gives these pictures an artistic feel (it is also possible to add glare in Photoshop).


So at that place you lot have it! You lot are now familiar with some of the ways y'all can remove flash glare in Photoshop, whether information technology from reflection, lights, or the sun.
To be sure, photo editing does take practice and experience, only with the data you learned in this tutorial, you'll be off to a proficient start. You will get an efficient photograph editor and be able to create the images you desire in no time.
If you establish this tutorial helpful, you lot also may be interested in checking out these manufactures:
- 17 Best Photo Editing Software for Photographers
- eleven Most Useful Portrait Photography Tips for Beginners
- Your Quick Guide to Layers in Photoshop
Do you want to boost your photography skills even further? Please follow united states on Twitter and Facebook to read more than of our free WordPress tutorials and other resources.
Using WordPress and want to get Envira Gallery gratis?
Envira Gallery helps photographers create beautiful photograph and video galleries in merely a few clicks and so that they can showcase and sell their piece of work.
Related Posts


Source: https://enviragallery.com/how-to-remove-flash-glare-in-photoshop/
Posted by: reedontomprods.blogspot.com
0 Response to "How To Get Rid Of Sun Flare In Camera Raw"
Post a Comment